TimeKeeper (Time Server)
Configure Application (clock.ini)
The TimeKeeper will be configured by the "clock.ini" file. The file configures the used time services and the size of the window. The entries are documented in the file, so we do not go into detail here.
Hint using of slave clocks through the serial interface/usb serial adapters
For controlling the serial interface no libraries have to be installed manually anymore. Depending on current system and architecture type, these are automatically detected and loaded as far as the value of "tochter" is set to "true" in the "clock.ini" file.
ATTENTION: On some Unix/GNU/Linux TimeKeeper must be started as administrator/superuser/root granting access to the serial port!
To run slave clocks by the serial interface a special driver interface is required.
Hint using of slave clocks through the Raspberry Pi GPIO interface
When running the application on a Raspberry Pi computer (supported models) and the value of "raspi" is set to "true" in the "clock.ini" file, the clock and short cut information can be tapped from pins of the GPIO interface.
The output pin selection is done via entries "raspiClockPin" and "raspiShortCutPin". Only valid header pin numbers are permitted in this place! This picture shows the layout of the GPIO header and the pin numbers. Additionally the output for the short cut pin can be inverted by setting "raspiInvertShortCut=true" property.
The WiringPi library must be installed on the system and it is also may be necessary running the application as administrator/superuser/root granting access to gpio port.
Because GPIO has no negative voltage level, the signal must be transformed to TTL first, before it is introduced into RUT wire!
Display model time by App
The model time of the master clock can be displayed by using an App on Android Smartphones (MRclock) or iPhones (iMRclock). You get these Apps at the each well known supply places. An overview can be found at the page of the swedish modulists. For using this feature the value "multicastMRclock" must be set to "true" in the "clock.ini" file. Further more, all phones must be connected to the same WiFi network like all other RgZm applications. In the App itself, only “Client” mode and “use Multicast”, as well as a time server (TimeKeeper) from the list, must be selected.
Run Application
Applications scripts are located in the bin subfolder and can be configured by the following optional cli parameter: [-c <config file>] [-h] [-n]
 -c,--config <config file>   Configuration file (default: clock.ini)
                             containing setup for serial and/or gpio
                             output.
 -h,--help                   Print help and usage.
 -n,--no-gui                 Start TimeKeeper as console application.
The parameter -c must point to a valid ini-file, which must be similar to the clock.ini. If no file is committed automatically the clock.ini will be used.
MS Windows
Execute the file timekeeper.bat to start the application.
Unix/Linux
Execute the file "timekeeper" to start the application.
Operation
After a short time the program window will be opened. Below the displayed time is a slider where the time scale factor can be setup. Just click on the arrow and slide it to the left or the right. The same can be done with the arrow buttons which are placed left and right to the big start/stop button.
At menu item "Time>Session-Times" in a dialog, you can define up to four target times and the start time. The TimeKeeper stops at all target times and all these times are saved in the user settings.
At "Time>Current Time" you can set the current time of the TimeKeeper in three ways: Setup only the current TimeKeeper time, synchronize slave clocks to the current TimeKeeper time or the combination of both: Setup up new time and syncronize slave clocks.
By setting up the current time you can choose one from the session times, if there any or enter a new one. Here optional the slave clocks could run by along.
If you want to synchronize slave clocks to the current TimeKeeper time, in the dialog you have to enter the time of the slave clocks and by hitting “ok” the run starts.
A combination of the last two is to setup a new TimeKeeper time an the synchronize all slave clocks to this new time.
The time format of the clock time is shown at the input fields and have to replaced by corresponding numerical values.
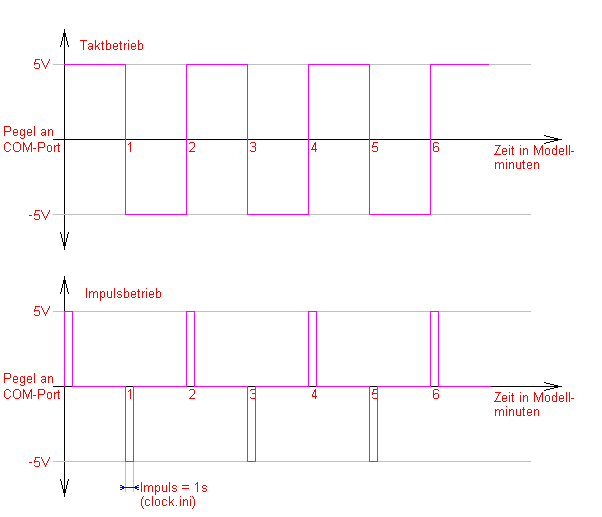
By activating "Impulse operation" the clock pulse is outputted to serial port only on minute change and with the value of "impulsDauer" defined in the "clock.ini" file, instead of permanent signal output. Switching can be done during current TimeKeeper operation; the change is effective on the next minute change.
By pressing "Reset User Settings" all session times and the start time will be resetted.
To exit the application just close the window or use the "Exit" entry of the "Time" menu.